Create a comment and reply system in Django.
In this article, we will create a comment and reply system in Django web application. It would be best if you had a basic understanding of Django before proceeding with this article.

Commenting on a post is a basic feature that every web application has. We have already created a blog application, and this article will create a comment and reply system in Django blog. Follow this link to go to the project repo of the blog application. You can still use this method if you have already created your own blog application.
The basic block diagram of a comment system is given below.
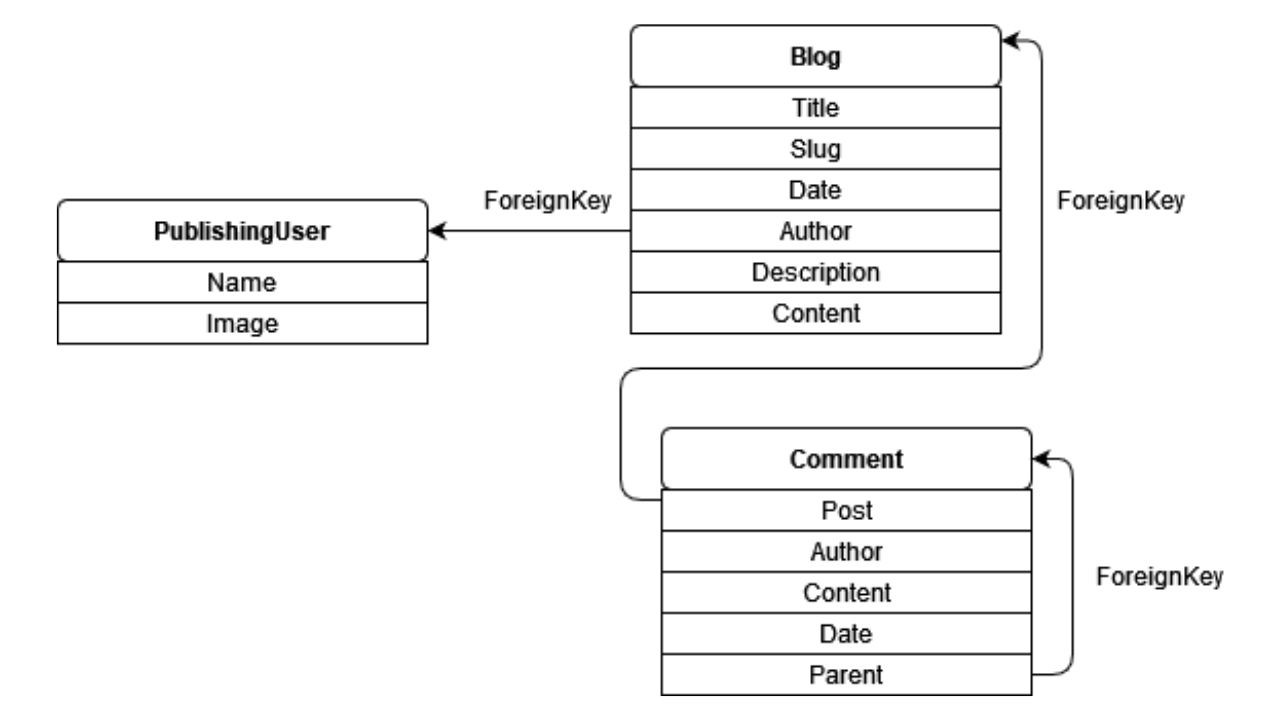
Block diagram of comment and reply system in django
After opening models.py of our blog application, we can see the following lines of code.
from django.db import models
from django.utils import timezone
from django.contrib.auth import get_user_model

# Create your models here.

class PublishingUser(models.Model):
    name = models.CharField(max_length=40)

    def __str__(self):
        return self.name

class Blog(models.Model):
    published_date_time= models.DateTimeField(default=timezone.now)
    title = models.CharField(max_length=200 , unique=True)
    slug = models.SlugField(max_length=200 , unique=True)
    author = models.ForeignKey(PublishingUser, on_delete= models.CASCADE , related_name='blog_posts')
    description = models.CharField(max_length=300, null=True)
    content = models.TextField()

    def __str__(self):
        return self.title
To create a comment and reply system in django, follow these steps.
Step 1: Creating comment models
Open models.py of blog application and paste the following lines of code.
from django.contrib.auth import get_user_model

class Comment(models.Model):
    CommentPost = models.ForeignKey(Blog , on_delete=models.CASCADE)
    author = models.ForeignKey(get_user_model() , on_delete=models.CASCADE)
    content = models.TextField()
    date_posted = models.DateTimeField(auto_now_add=True)
    parent = models.ForeignKey('self' , null=True , blank=True , on_delete=models.CASCADE , related_name='replies')

    class Meta:
        ordering=['-date_posted']

    def __str__(self):
        return str(self.author) + ' comment ' + str(self.content)

    @property
    def children(self):
        return Comment.objects.filter(parent=self).reverse()

    @property
    def is_parent(self):
        if self.parent is None:
            return True
        return False
Model description:
- There is a ForeignKey called CommentPost, which establishes a many-to-one relationship with the blog post.
- There is a ForeignKey called parent, which establishes a many-to-one relationship with itself (self) because a comment can have many replies, but a reply can have only one parent.
- children filters all the replies of the comments
- is_parent categorizes whether a comment is parent or reply of comment.
Step 2: Creating views, forms and templates
Go to views.py and edit the BlogDetail class as follows.
class BlogDetail(DetailView):
    template_name= 'detail.html'
    model= Blog

    def get_context_data(self , **kwargs):
        data = super().get_context_data(**kwargs)
        connected_comments = Comment.objects.filter(CommentPost=self.get_object())
        number_of_comments = connected_comments.count()
        data['comments'] = connected_comments
        data['no_of_comments'] = number_of_comments
        data['comment_form'] = CommentForm()
        return data

    def post(self , request , *args , **kwargs):
        if self.request.method == 'POST':
            print('-------------------------------------------------------------------------------Reached here')
            comment_form = CommentForm(self.request.POST)
            if comment_form.is_valid():
                content = comment_form.cleaned_data['content']
                try:
                    parent = comment_form.cleaned_data['parent']
                except:
                    parent=None


            new_comment = Comment(content=content , author = self.request.user , CommentPost=self.get_object() , parent=parent)
            new_comment.save()
            return redirect(self.request.path_info)
Create a file called forms.py and paste the following lines of code
from django import forms
from django.db.migrations.state import get_related_models_tuples
from .models import Comment
from django.utils.translation import gettext_lazy as _

class CommentForm(forms.ModelForm):
    class Meta:
        model = Comment


        fields = ['content','parent']

        labels = {
            'content': _(''),
        }

        widgets = {
            'content' : forms.TextInput(),
        }
Go to templates/detail.html and the following lines of code.
<h2> Comments </h2>
{% if user.is_authenticated %}
<form action="" method="POST" id="main_form" class="comment_form">
<div>
<label for="comment">Type Comment here</label>
{{ comment_form.content }} {% csrf_token %} <input type="submit" value="Post"></div>
</div>
</form>
{% else %} <h2>You need to Login to comment</h2>
{% endif %}
{% for comment in comments %}
{% if comment.is_parent %}
<h3> <b>{{ comment.author }} : </b> {{ comment.content }}</h3>
{% endif %}
{% for replies in comment.children %}
<h3> <b>{{ comment.author }} : </b> {{ replies.content }}</h3>
{% endfor %}
{% endfor %}Now migrate the database using the following commands.
python manage.py makemigrations
python manage.py migrate
Now type the URL localhost:8000 in your browser and visit a blog page. You need to sign in to post a comment. After signing in, you can post a comment in the form and see the comment on the page as shown below.
Comment system in Django blog
The final step to create a comment and reply system in django is creating a reply system itself.
Step 3: Creating reply system
To create a reply system, follow these steps:
- create a reply form in each parent comment
- create a hidden field whose value is the primary key of the parent comment.
- Format the comment and replies by using some indentation.
For this, we edit previous code in templates/details.html as follows.
<h2> Comments </h2>
{% if user.is_authenticated %}
<form action="" method="POST" id="main_form" class="comment_form">
<div>
<label for="comment">Type Comment here</label>
{{ comment_form.content }} {% csrf_token %} <input type="submit" value="Post"></div>
</div>
</form>
{% else %} <h2>You need to Login to comment</h2>
{% endif %}
{% for comment in comments %}
{% if comment.is_parent %}
<h3> <b>{{ comment.author }} : </b> {{ comment.content }}</h3>
<form action="" method="POST" id="main_form" class="comment_form">
<div>
<label for="comment">Reply here</label>
<input type="text" name="content"> <input type="hidden" value="{{ comment.pk }}" name="parent"> {% csrf_token %} <input type="submit" value="Post"></div>
</div>
</form>
{% endif %}
{% for replies in comment.children %}
<h3> <b>{{ comment.author }} : </b> {{ replies.content }}</h3>
{% endfor %}
{% endfor %}Now go to localhost:8000 in your browser and visit any one blog page. After signing in, you can post a comment and reply to the comment as shown below.

Reply system in Django blog
Visit this repo to get the full source code of comment and reply system.
Tags
Comments
warning You need to Sign Up to Comment
 @njokus
 22 NOV, 2022
hello, the repo to get the full source code of comment and reply system does not exist can you provide me your code source ,please SISHIR WAGLE
Reply